Normally the user clicks on your WhatsApp Widget and goes to WhatsApp directly. But if you want to have better leads it’s a good option to have a short form before sending the user to WhatsApp. If you ask some pre-conversation questions to your customers, you can have a better lead, better contact for your sales or support team. Because the clients at least tell you something about what they need, why they need support, where they are from, their age, email… any data you may need to start a conversation with your client.
In this article we tell in detail how you can add and edit forms in your WhatsApp Widget.
First you should have your agents created, one or more depending on what you need. You can see and manage them on the “Agent” tab of your account.

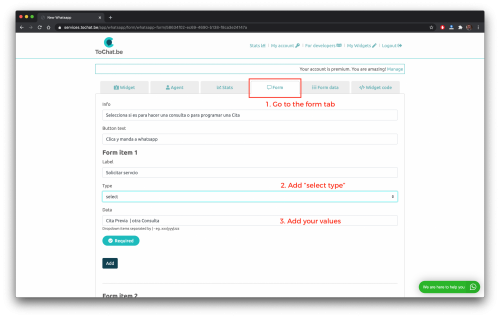
Once you set the agents, you can go to “Form” tab to add/edit the forms assigned to each agent.

Set your Form
Info: At the beginning of the form you can enter a short intro text telling the purpose of this form; such as “Let us know your questions, we are here to answer”, “We need this information to offer a better support” etc.
Button text: That is the text that goes to your button of iniciating WhatsApp chat. You can write “start conversation”, “iniciate WhatsApp chat” etc so the user know he’s going to click and jump to WhatsApp.

Form Item: You should insert each question as a separate Form Item. At Label you enter the question (e.g. “Please add your domain” or “Please select your country”) and the field below you choose what Type of answer should be introduced; text, time, date. If you want to offer a dropdown of answers among which the user would pick, choose “Select” as Type and enter the options in Data field using separators “|”.

Once you prepare the form, at the bottom of the page click on Send to add the form to your agent. Now the user clicks to chat, answers the form questions and when the chat iniciates, the data introduced goes directly to WhatsApp conversation.
It’s a useful data for your team because they are going to know who is the user and what they want. Apart from going to WhatsApp conversation, the data is also saved in the database. Go to “Form Data” tab of your account and you will see all the infomation from the form. The phone number of the agent, IP, date and value of the form that’s been submitted. You can send this data to Hubspot or download it as an excel file. This helps you keep yout CRM updated so you sync users back and forth from your WhatsApp Widget in your web/landing page etc, to your CRM database.

You don’t have to add a form to every agent. You can choose the agent with more leads, such as “Support Agent” that usually requires preliminary info about the conversation, to understand better what’s the issue. Also “Sales Agent” could use it to know better the client and offer the best solution or “Recruiting Agents” to clean-up the database a little and get filtering information beforehand.

To sum up adding form process in a short guide;
- Go to your account.
- Go to Forms Tab
- Add your form.
- You can select a field type “Select”
- Add your values
- Save
We believe its an easy but important feature you can add to your Widget, while presenting a positive user experience.